This guide will show you how to disable "Headset Advanced Exclusive Mode" in Windows 10 and 11.
Disabling this feature can help to resolve audio switch issues and allow for simultaneous audio playback.
For Windows 10
Steps
Open Sound Settings
Access Sound Control Panel
Disable Exclusive Mode for Your Headset
Disable Exclusive Mode
Confirm Changes
Apply Changes in Sound Properties
1. Open Sound Settings
Right-click on the speaker icon in the Windows taskbar.
Select "Open Sound settings" from the context menu.

2. Access Sound Control Panel
In the Sound settings window, under the "Related Settings" section, click on "Sound Control Panel."

3. Disable Exclusive Mode for Your Headset
In the Sound properties window, go to the "Playback" tab if it's not already selected.
Locate your headset in the list of playback devices.
Select your headset to highlight it.
Click the "Properties" button located at the bottom right of the window.

4. Disable Exclusive Mode
In the Properties window for your headset, go to the "Advanced" tab.
Under the "Exclusive Mode" section, you will see options like "Allow applications to take exclusive control of this device" and "Give exclusive mode applications priority." Uncheck both options to disable exclusive mode.
Click the "Apply" button to save your changes.

5. Confirm Changes
Click the "OK" button in the Properties window to close it.
6. Apply Changes in Sound Properties
Back in the Sound properties window (from Step 3), ensure you have clicked the "OK" button to save the changes you made for your headset.

For Windows 11
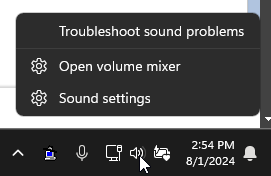
Please locate the sound speaker icon in the toolbar and right-click -
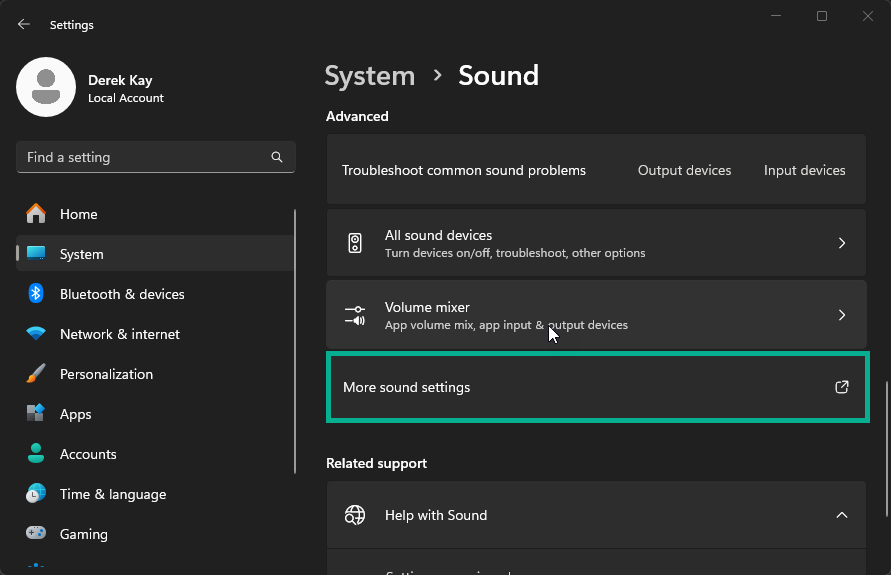
Scroll down on the page until you see "More Sound Settings" and left-click on that -
When you click on "More Sound Settings" it will pop up a new little box. You will want to select your headset from the list, and then select "Properties".

Another box will pop open on the screen and you'll want to select the "Advanced" tab, then find the "Exclusive Mode" area, untick box boxes as shown below click apply, and then OK. -
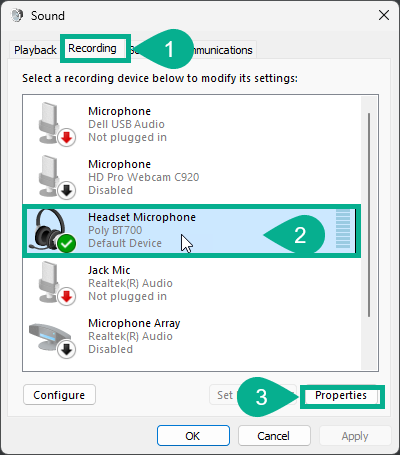
You will then want to go back to the "Sound" window select the "Recording" tab window select the headset, and then press the Properties button
Another box will pop open on the screen and you'll want to select the "Advanced" tab, then find the "Exclusive Mode" area, untick box boxes as shown below click apply, and then OK -

Note: If you are still experiencing audio issues after disabling Headset Advanced Exclusive Mode, you may need to contact Natterbox Support ensuring you provide the necessary call examples for further review.